Installation
If you bought a complete system from JLT, everything's already installed, tested, and running. You can skip down to the General Use section. If you've lost EB Pocket in a crash or reset, you shouldn't reinstall it manually; instead, use the Data Backup program (Axim) or the iPAQ Backup program (iPAQ) to restore the system, either from the last backup you made or from the one I included with your system. The backup file is already right there on your PDA (in safe internal flash or on the memory card), so all you have to do is tap a few buttons and you'll be back in business. The backup file will restore the LICENSED PROFESSIONAL version of EB Pocket--if you install EB Pocket from scratch you'll lose those professional features once the free trial period ends.
If you're putting a system together yourself, download EBPocket , unzip it to yield a folder called EBPCC...., delete all files and folders from the "cabs" folder except EBPocket.PPC2003En_ARM.cab, and copy the EBPCC.... folder to your memory card. (A reminder: if using a card reader to transfer the files, remember to follow your computer's procedure for safely removing a memory card--otherwise the memory card could be permanently damaged).
Next, with the card back in the PDA or SmartPhone, use File Explorer (ファイル・エクスプローラ) to browse to the EBPPC folder on the card, open the folder marked "cabs" and click on the file in there. In WM6, you'll be asked where you want to install it; choose "Device." WM2003SE will put do the same thing without asking you. This will install EBPocket to the Program Files directory in your main memory.
 | When you first look in the "cabs" folder, there will be MANY installers to choose from. As you can see, only the first part of the name shows on the PDA, which is why I suggested deleting all the others (most of which are for very archaic devices). EBPocket.PPC2003En_ARM.cab is the best choice for all versions of Windows Mobile, from WM2003 forward all the way to the latest WM6.X. Yes, there's a special WM5/6 installer, but it's harder to use, it doesn't add any features or work any better, and its design wastes screen space and hides the menus, meaning you need a couple of extra taps to do anything. |  | |
| | | |
You're finished.
Adding Dictionaries/Editing Dictionary Groups
Important note: this section is for people adding their own dictionaries. If you've bought a complete system from JLT, all this has been done for you already--you don't need to do it. Unless you wish to change the dictionaries on your JLT system, skip to the next section, General Use.
First, an EPWING dictionary consists of an entire folder. After downloading and unzipping that folder, or copying it from a CD or DVD, DO NOT DO ANYTHING TO THAT FOLDER OR ITS CONTENTS. Do not try to open any of the files in the folder; do not move, rename, or do anything at all to any file or subfolder inside that main folder. Simply copy the entire folder to the memory card (it can go anywhere on the card). The one exception is for an EPWING dictionary you got from a source other than JLT--in that case, you should use the EBShrink program as described here (same page also has more info about obtaining and converting dictionaries from other sources). Dictionaries from JLT, and the extra dictionaries on your JLT backup DVD, have already been EBShrunk, so you don't need to do that.
If you're setting up EBPocket for the first time, the easiest thing is to put all your dictionaries on the memory card BEFORE starting EBPocket for the first time. When you start EBPocket for the first time, it automatically finds all dictionaries on your device and adds them to its dictionary list. If you got an SD card from anywhere but JLT, you should first reformat it with a program called CNetX FlashFormat (a digital camera may also work, but DO NOT reformat it from a Mac or Windows computer). SD cards usually come slightly misformatted--they work fine in a camera or computer, but in Windows Mobile, Palm, and other portable devices files start disappearing after a while. Cards from JLT come properly formatted to begin with.
If you add another dictionary to your card later, the easiest approach is to use the "Edit Group" function from the Tool menu (obviously Add Dict will also work, but Edit Group is easier and gives you more control). Even if the program automatically added all your dictionaries when it first started up, you can also use this function to change the order in which the dictionaries appear in the menus.
- Tap "Tool" to bring up the Tool Menu
- Tap "Edit Group"
See the image for the next steps

- Upper window will show all dictionaries on the PDA or memory card, the lower will show only those EBPocket is configured to use. Upper window is empty at first--tap "Find" to search for all the EPWING dictionary files on your device and memory cards.
- Tap a dictionary in the upper window to select it, then tap "Add" to add it to EBPocket's list in the bottom window.
- Tap a dictionary in the botton window, then tap "up" or "down" to move it up or down in the list in you'll see in the Dict menu.
- Tap a dictionary in the botton window, then tap "Delete" to remove it from the EB Pocket menus (the actual dictionary folder and files won't be deleted from the device or memory card).
- Tap OK when done.
When you add a new dictionary (or start EBPocket for the first time), all the dictionaries will be in the default "EBPocket" group. Most people will probably be happy to leave them there--if that's you, then skip down to General Use. If you find your dictionary list getting too long for your taste, you can create different dictionary groups--e.g., put history, biography, Buddhism, and Bible references in a Reference group and keep all the Japanese dictionaries in the EBPocket group (you can't get rid of or change the name of the EBPocket group). Tap "Edit Group..." from the Tool menu. Use the down arrow in the "Group" box to choose from the current groups, New to create a new group, and delete to delete a group. Now you can add and subtract dictionaries from your different groups.
General Use
Main Screen at full VGA size--on a VGA PDA like the Axim X51V, the image has the same 480x640 pixels you see below, but in a smaller screen, so it actually looks a bit sharper than this | | |
|  | | |
| Current dictionary | | |
| | Find button & search type | | |
| Search box | | |
| List of results | | |
| Drag the dividing line up or down to change the relative sizes of the two parts of the screen. | |
| | |
| Call up/Choose input method | |
| Hop highlight next instance of search term | | Split Toggle split screen/full screen;  on newer versions on newer versions
| | |
| Back & Forward arrows | | |
| | | | | | | | | | | | |
Looking up words.
Enter a character, word, or phrase in the search box (see the IME page for how to enter text) and tap Find. This will look it up in the current dictionary. Alternatively, you can choose a different dictionary from the Dict... menu to look up a word in that (it looks it up as soon as you tap the other dictionary--you don't need to tap Find). That's all you need to know to look up words in EBPocket.
I generally keep Search Type set to Begin (which is the default). Thus, if I enter "bully," the search will find all terms beginning with "bully." At times, searching Eijiro or Waeijiro--the biggest dictionaries--can take 2-3 seconds this way. If you change the search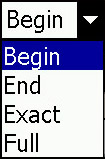 type to "Exact," the search is nearly instantaneous. I don't mind the wait, so I don't bother changing the setting. Also, Exact searches don't work in Edict (a feature, not a bug! designing it this way puts more information in the results index, convenient for quick reference). Especially when searching for Japanese words, sometimes you know the final kanji or two but not the beginning of the word; in this case, choose End as the search type and it'll find words ending in the search term. Finally, Full searches the full text of the dictionary. Thus, if you enter "horse," it'll find every entry in which the word "horse" appears. This can take forever, and if you enter a Full search for a common kanji or word in a huge dictionary like Eijiro, you might have to sit there watching your PPC's "I'm thinking" icon for quite a few minutes. It's useful when you need it, but be careful with the Full search option. In Eijiro and Waeijiro, you also have the option of doing Cross search (much faster and better focused than Full, as it searches only the keywords)--see the Eijiro page for details on Cross.
Super Jump
You can drag the stylus across any character, word, or phrase to select it, then press and hold the stylus on the highlighted text to bring up an action window, from which you can look it up in the current dictionary (Search Word) or any other dictionary (Specific Dictionary, then choose the dictionary). This is great for finding the meaning or pronunciation of a Japanese word in a definition--or in any other EPWING document on your PDA (the Bible, various encyclopedias, Buddhist texts, historical and biographical dictionaries)--or looking up a new kanji. (This feature is usually called "super jump" in electronic dictionaries. Animation is from an older version of Eijiro).
One note: in practice, selecting text sometimes looks odd, but works well. The selected text theoretically shows up in reverse, white text on a black bar, as shown in the animation below. However, sometimes it'll show a vertical bar or cursor or underline at the start of the bit you selected, then nothing for a few characters, then a black bar with white characters until the end of where you've selected. It looks like it hasn't registered your selection, but it has. Also, if you do a lot of it, sometimes your previous selection will still show up as selected, but it isn't--once you make a new selection it replaces the previous one (sometimes the program just forgets to wipe out the display of the previous selection--also as shown in the screenshot below). Just ignore these oddities and trust that it actually has selected what you wanted--you'll get used to it pretty quickly and won't even notice the odd display.

History/Back/Forward
 Pretty simple. Tap the down arrow in the Search box to bring up a list of previous searches (oddly, you usually have to do it twice--the first time, the list flashes up and disappears, the second time it stays). Tapping an item in the list puts in the Search box but neither initiates a search (you still have to tap Find) nor changes the dictionary. From the History option in the Edit menu, you can erase your current history, save it for future reference, or load a previously saved history. You can also access the saved histories with a word processor, copy them to another computer or even another PDA running EB Pocket, etc. (you can find them in the EBPocket folder in the Program Files folder in the main memory on the Axim; MS Word on English OS Axims can't figure out the encoding and so will show all the Japanese words as gibberish).
The blue Back Arrow at the bottom of the screen takes you back to the screen and dictionary you were in previously--and it remembers quite a few previous steps. After you've gone Back, then you use the Forward Arrow to go forward. These work just like the forward and back buttons on your web browser. Note--sometimes the buttons are grayed out but still work if you tap them.
Menus and Buttons
From the Dict menu, you can change dictionaries and dictionary groups.
Edit contains the usual suspects--cut, paste, copy, select all, find (I suspect this intended for reading eBooks rather than dictionaries--with dictionaries, it seems to duplicate the function of the search box)--plus a couple of more interesting options. History... lets you delete, save, and load histories, as described above. Cursor Mode seems to make it easier to select text with the stylus so I recommend leaving it selected; it also lets you navigate by moving a cursor with the physical directional control buttons under the screen: first use the up/down buttons to select the word you want from the results list in the top window, press the Enter button in the middle of the directional buttons to bring that entry up in the lower window and move the cursor to that window, then, to select a word and jump to its entry in the current dictionary, put the cursor in front of it and press the enter button. Unlike using the stylus, there's no way to look up a word in a dictionary unless you've selected Search All Dictionaries in the Find menu, but with the number of entries that come up in the large dictionaries I find it more efficient to leave Search All Dictionaries off.. Launch Editor copies the text from the beginning of the selected entry forward (I'm not sure exactly how many characters forward) and opens an MS Word window with the selected text: you can save it or do whatever you like with it, but note that this feature doesn't change the actual dictionary contents. Wordbook is for saving words and their entries into a special study file. I'll add more on it later, but the basic functions are pretty obvious. Note that wordbook files are simply text files--you can copy them to your computer and do whatever you like with them (MS Word on the English OS Axims can't figure out the encoding and shows them as gibberish, but most programs on your computer should have no problem). One nice use for this functionality is to take a wordbook and edit it on your computer to turn it into a flashcard set for KingKanji or your other favorite study program. Another is to prepare a list of words you'll need to be able quickly in a particular situation--a visit to the doctor or to the tax or visa office or some other branch of the bureaucracy.
The Find menu gives you some fancy search options with certain dictionaries--seems like they'd be more useful with an encyclopedia, but I haven't tried them out, so I can't say much about them.  Do NOT check the Incremental Search option--on the latest versions of the program it doesn't work properly and makes it impossible to enter a word to search for. If you check Search All Dictionaries, then EBPocket will search all dictionaries rather than just the chosen dictionary for any words you enter. Because of the number and size of the dictionaries in the JLT system, I find this gives me a lot of irrelevant results to wade through; I find it more efficient to choose the dictionary I expect to get the best results in. Leaving Search All Dictionaries unchecked also makes some searches run much faster.
The Tool menu has the aforementioned Add Dict..., Scan All Dictionaries..., and Edit Group... functions. Goto seems like it should duplicate the forward and back buttons, but doesn't seem to do anything on mine. Copyright brings up copyright information--most of the JLT dictionaries also include some helpful usage information here. Continuous will show you a continuous stream of results in the lower search results window, not just the result you've tapped in the results index window above, but that entry and the following and preceding ones--the one you tapped will be first, but you can scroll up and down through the dictionary. I recommend selecting Continuous--no reason not to. Options... brings up various options, including setting the fonts and font size in the results and results index windows--the rest is all pretty self-explanatory, though I just leave everything except the type sizes at the defaults. Status Bar causes a status bar to appear just above the bottom toolbar--tells you things like, "23 results in Eijiro." I don't think it's worth the screen space it takes up, but if you like it, enjoy.
The Hop button  highlights the first instance of the search term; press it again and the highlight jumps to the next instance--etc. The Split button (
 or ) toggles between the two states of the main window--(1) a split screen with a list of results on the top and the full text of the selected result (and the following ones) on the bottom (tap an item from the list in the top part to show the full result from that entry in the bottom window) and (2) the full text of the selected result (and the following ones) taking up the full window. The letter "A" in the screenshot above (at other times, you might see a hiragana "あ" or a graphic here) brings up the text input system, in whichever mode it was last used: あ, for whatever odd reason, is the symbol for the numerical and symbol input keyboard; A is the alphanumeric keyboard to enter English or Japanese (works just like the IME on your regular computer); the hand-and-brush graphic is for handwritten input (the kanji recognition is fantastic); and the hand-and-stylus graphic is for a shorthand entry system that seems a lot like Grafitti on the Palm (hint: as you write a character, a list of choices will appear--tap the one you want, or simply wait and the first option will automatically be chosen; if you don't want to wait, start writing the next character in the next of the three boxes).
)
)