
This is for JLT customers to whom I've had to ship the battery separately due to recent shipping difficulties. First, again I apologize for sending your system in two pieces--I'd much rather send it as one piece, so that all you have to do is turn it on and it's ready to use, but at the moment that's not possible. Thank you for your patience.
In the X30, all the settings and added programs are held in the main memory, and the main memory requires a bit of power to hold that data. Without battery power, the Axim reverts to its factory state. Fortunately, the way it's designed makes it easy to get going. There are two parts of the process: setting up the Axim itself, then restoring all the programs and settings that make up the JLT system (restoring that is mostly automatic).
Both steps together will take 4-5 minutes, though only about a minute of that actually involves you doing things--the rest of the time is just waiting as the Axim does all the hard parts automatically. You might look at this page and gasp at how long it is--but the reason it's so long is that I've tried to make this as simple as possible and have broken down the process into very tiny steps. This page shows every screen you'll encounter along the way, and at each screen, there's usually just one thing to tap, so each screen will take you only a second or two get through (though reading what to do will add a couple of seconds to each screen). In short, you really will be done in just five minutes!
(skip ahead to how to restore the JLT system after you've finished setting it up)
After a power loss, crash, or hard reset, you have to go through a quick process before the Axim is ready to use.
In this case, first, insert the battery: With the Axim face down on a flat surface in front of you, use the stylus to slide the latch to the right (away from the battery compartment), insert the left side of the battery, then press down on the right until the battery cover is flush with the back of the Axim (may take a firm push), then release the latch. If your battery has been shipped directly to you by a third party (not by JLT), it may be empty or nearly so. You should plug the Axim into the power supply (as described in the Getting Started email, though from how the pieces fit together you can probably figure it out on your own) to charge it. You can do the steps below right away, while it's charging--and once the system is set up, you can check the battery level to see if you need to keep charging it.
Now, press the power button to turn the Axim on--it's on the front, centered above the screen. Nothing will happen for a few seconds, then the screen will light up, and after a few more seconds a logo will appear. This is the first round of waiting--the Axim is automatically reinstalling its OS from a safe copy in a chip on the motherboard, so there's nothing for you to do until it's done, which could take a few minutes. When it's done, you'll see the screen below (for understandability, all screenshots show the English OS versions of the screens, but the Japanese versions you'll see look exactly the same; my comments are in red):
Just do what it says above--tap the screen to begin the process. Then you'll see this screen:
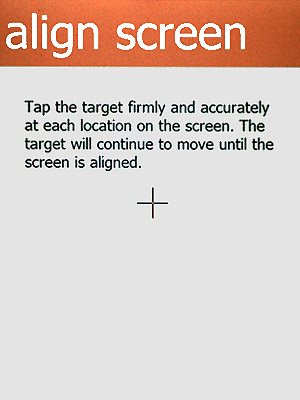
Again, do what it says--tap the center of the cross-hairs. It may take a couple of seconds to respond, or it may do so instantly, but the cross-hairs will then move to the upper left corner. When they've stopped there, tap the center of the cross-hairs again. You'll have to do this for each corner. Occasionally, after the last corner, it'll move to the center again--if that happens, do it again. Once it's aligned, you'll see this screen:
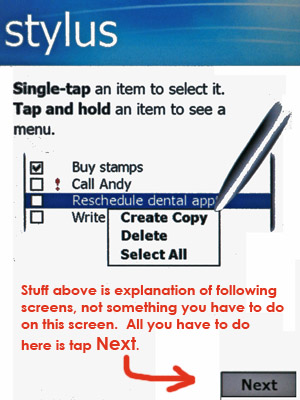
Just tap "Next." Then you'll see this screen:

The purpose of this is to teach you how to use the stylus: tap to choose something or press a button, press and hold to bring up the pop-up menu and do things like cut, copy and paste. So press and hold the stylus on the appointment shown until a pop-up menu appears, like this:

One option in the menu ("Cut") is shown in red (on your Axim as well as in this picture). Tap it, and then you'll advance to the next screen:

Just do what it says above: press the stylus on the line next to "11" and hold it there until the menu appears again:

and, again, tap the red item in the menu, which this time is Paste. At this stage, all you have to do is tap the red item, but in the future, if you want to know what those other options in the menu say, you can see the list here (some people have printed that list and taped it to the inside cover of their Axim case until they got used to those few kanji items they use--though if you only use the dictionary, you won't be seeing them again). After you've tapped "Paste," you'll see the following screen:
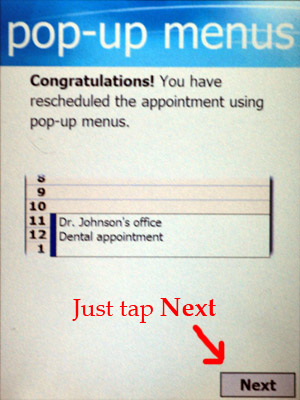
Nothing to do here--just tap "Next" to go to the next screen:

In the Japanese OS version, since it's got the Japanese OS, it'll have Japan Standard Time (GMT+9) set by default--you don't need to change it unless you're not in Japan. For the convenience of US customers,
Eastern Standard Time is GMT-5
Central Standard Time is GMT-6
Mountain Standard Time is GMT-7
Pacific Standard Time is GMT-8
Tap "Next" to go to the next screen:

Another useless screen. Tap anywhere to go on:
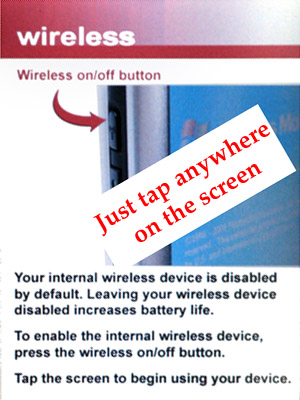
Now you're almost done. Tap anywhere to exit the setup routine and begin using your device. The first screen you'll see is the Today screen:

At this point, warnings may pop up telling you that the backup and/or main battery is low. Just click "OK" and they'll go away. You'll notice that the time is a bit off (again, the Axim thinks it's just left the factory); tap the time to bring up the screen to set it. You've now finished setting up your X30.
Your Axim is now ready to go, but it's still just a an Axim, not a JLT dictionary. It's as it was when it left the Dell factory, without the programs and settings that turn it into the JLT dictionary system. However, everything it needs is right there on the SD card inside it, including a backup file that will automatically restore the necessary programs and settings automatically. You're only five taps and one button press away from the end! Here's all you have to do.

From the Today screen you should now be seeing, tap "スタート" at the top left to pull down the Start Menu (if you've already been playing around and you're no longer at the Today screen, just tap whatever it says in that same position--you can always access the Start Menu this way). Here's the Start Menu:

In the Start Menu, tap ”プログラム" to go the Program Menu:
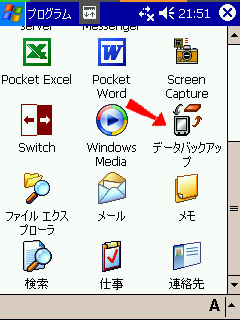
Use the slider at the right to scroll down until you see "データバックアップ," the Data Backup program, and tap it. The program will start up and you'll see this:

The program starts up in the Backup mode. You don't want to make a new backup--you want to restore from a previous one--so you should tap the "復元" ("ふくげん," Restore) tab to go to the Restore mode:

By default, the Restore mode will set itself up to restore from the last backup, so all you'll have to do is tap "スタート" to start the process. It may through up a couple of screens asking for confirmation--it it does, simply tap "はい" or "OK" to acknowledge them and make them go away. The last one confirms that the process is complete and tells you to do a soft reset --tap "OK" to acknowledge it.
At this point, the changes have been made but haven't taken effect yet. Before doing anything else, do a soft reset. Turn the Axim over, and on the back, below the lower right corner of the battery door, a centimeter or so (about half an inch) up from the bottom of the Axim, you'll see a small hole. Use the tip of the stylus to press the little button inside it. The Axim will shut down and then start up again, the screen will freeze showing the Dell logo for 30 seconds or so, and then you'll see the Today Screen again. The JLT system is now ready to use.
Tap "スタート" to pull down the Start Menu, as you did before, and now you'll see EB Pocket in the top part of the list. Tap it to begin using the dictionaries. One note: if you leave the EB Pocket window up when you put the Axim to sleep (pressing the power button doesn't actually shut the Axim down--it just puts it to sleep), then when you start it up again, EB Pocket will be right there ready to use immediately. For information on how to enter Japanese text to look up, see the text entry section of the general instructions.
You'll also notice this icon ![]() in the top bar. This is Switcher, a very useful tool if you end up using more than just one program. See the general instructions for more information on Switcher.
in the top bar. This is Switcher, a very useful tool if you end up using more than just one program. See the general instructions for more information on Switcher.